写在前面 好久没更新,之前立的 toWrite plan几乎全倒了
不过比较好的是,去年flareon2018做了6/12,立了个flag今年要拿牌
现在做到了!!!
所以必须得来更新一下writeup
其实跟去年的题目比较,感觉今年前面的题目相对比较简单,因此前面做的比较快
最后卡在了最后一题,断断续续做了快20天,心态都快崩了
不过还好,最后还是拿到了牌(虽然现在还没寄到手上
不得不说,flareon总是能学到许多
下面开始描述我的解法,在记录完我的解法后,我才会提及到一些题目相关(题目设计、官方解法)
1 - Memecat Battlestation .net直接逆,很简单,xor 一下就出来了
2 - Overlong 一段data,程序只循环了0x1c次,把循环patch成0xb0次,则那块数据的长度,得到flag
3 - Flarebear 这是一道android题,用kotlin写的apk,直接逆
对小熊有3种操作play, feed, clean
能看到满足一定条件后会调用dancewithflag
总结一下
1
2
3
4
5
6
7
8
9
10
11
12
13
14
15
16
17
18
19
20
21
22
23
24
play mass -= 2 happy += 4 clean -= 1 feed mass += 10 happy += 2 clean -= 1 poo += 0.34 clean poo -= 1 if poo > 1 mass += 0 happy -= 1 clean += 6 setMood setMood isHappy feed/play = [2, 2.5] isEcstatic mass = 72 happy = 30 clean = 0 call danceWithFlag
得到方程
-2p + 10f = 72
4p + 2f - c = 30
-p - f + 6c = 0
解出,得到flag
p = 4
f = 8
c = 2
4 - Dnschess 一个下国际象棋的ai,通过dns协议与server交互
包含有一个pcap数据包
chessAI会把每一步编码成类似pawn-d2-d4.game-of-thrones.flare-on.com的域名,然后通过dns查询得到ip
注意到得到的ip会把数据取出来操作
并得到值放进`@flare-on.com `前面的buffer上,我通过scapy从pcap中提出来ip,模拟一下操作就得到flag了
1 2 3 4 5 6 7 8 9 10 11 12 13 14 15 16 17 18 19 20 21 22 23 24 25 26 27 28 29 30 31 32 33 34 35 36 result = [0x00 , 0x00 , 0x00 , 0x00 , 0x00 , 0x00 , 0x00 , 0x00 , 0x00 , 0x00 , 0x00 , 0x00 , 0x00 , 0x00 , 0x00 , 0x00 , 0x00 , 0x00 , 0x00 , 0x00 , 0x00 , 0x00 , 0x00 , 0x00 , 0x00 , 0x00 , 0x00 , 0x00 , 0x00 , 0x00 , 0x40 , 0x66 , 0x6C , 0x61 , 0x72 , 0x65 , 0x2D , 0x6F , 0x6E , 0x2E , 0x63 , 0x6F , 0x6D , 0x00 , 0x00 , 0x00 , 0x00 , 0x00 , 0x00 , 0x00 , 0x00 , 0x00 , 0x00 , 0x00 , 0x00 , 0x00 , 0x00 , 0x00 , 0x00 , 0x00 , 0x00 , 0x00 , 0x00 ] table = [0x79 , 0x5A , 0xB8 , 0xBC , 0xEC , 0xD3 , 0xDF , 0xDD , 0x99 , 0xA5 , 0xB6 , 0xAC , 0x15 , 0x36 , 0x85 , 0x8D , 0x09 , 0x08 , 0x77 , 0x52 , 0x4D , 0x71 , 0x54 , 0x7D , 0xA7 , 0xA7 , 0x08 , 0x16 , 0xFD , 0xD7 ] def genResult (ip ): if ip[0 ] != 127 or ip[3 ] & 1 : return print ip a1 = ip[2 ] & 0xf result[2 *a1] = ip[1 ] ^ table[2 *a1] result[2 *a1+1 ] = ip[1 ] ^ table[2 *a1+1 ] from scapy.all import *def getIp_list (): ip_list = [] pkts = rdpcap('capture.pcap' ) for p in pkts: if p.haslayer(DNS): if isinstance (p.an, DNSRR): ip = p.an.rdata ip_list.append(list (map (int , ip.split('.' )))) return ip_list ip_list = getIp_list() for ip in ip_list: genResult(ip) print '' .join(map (chr , result))
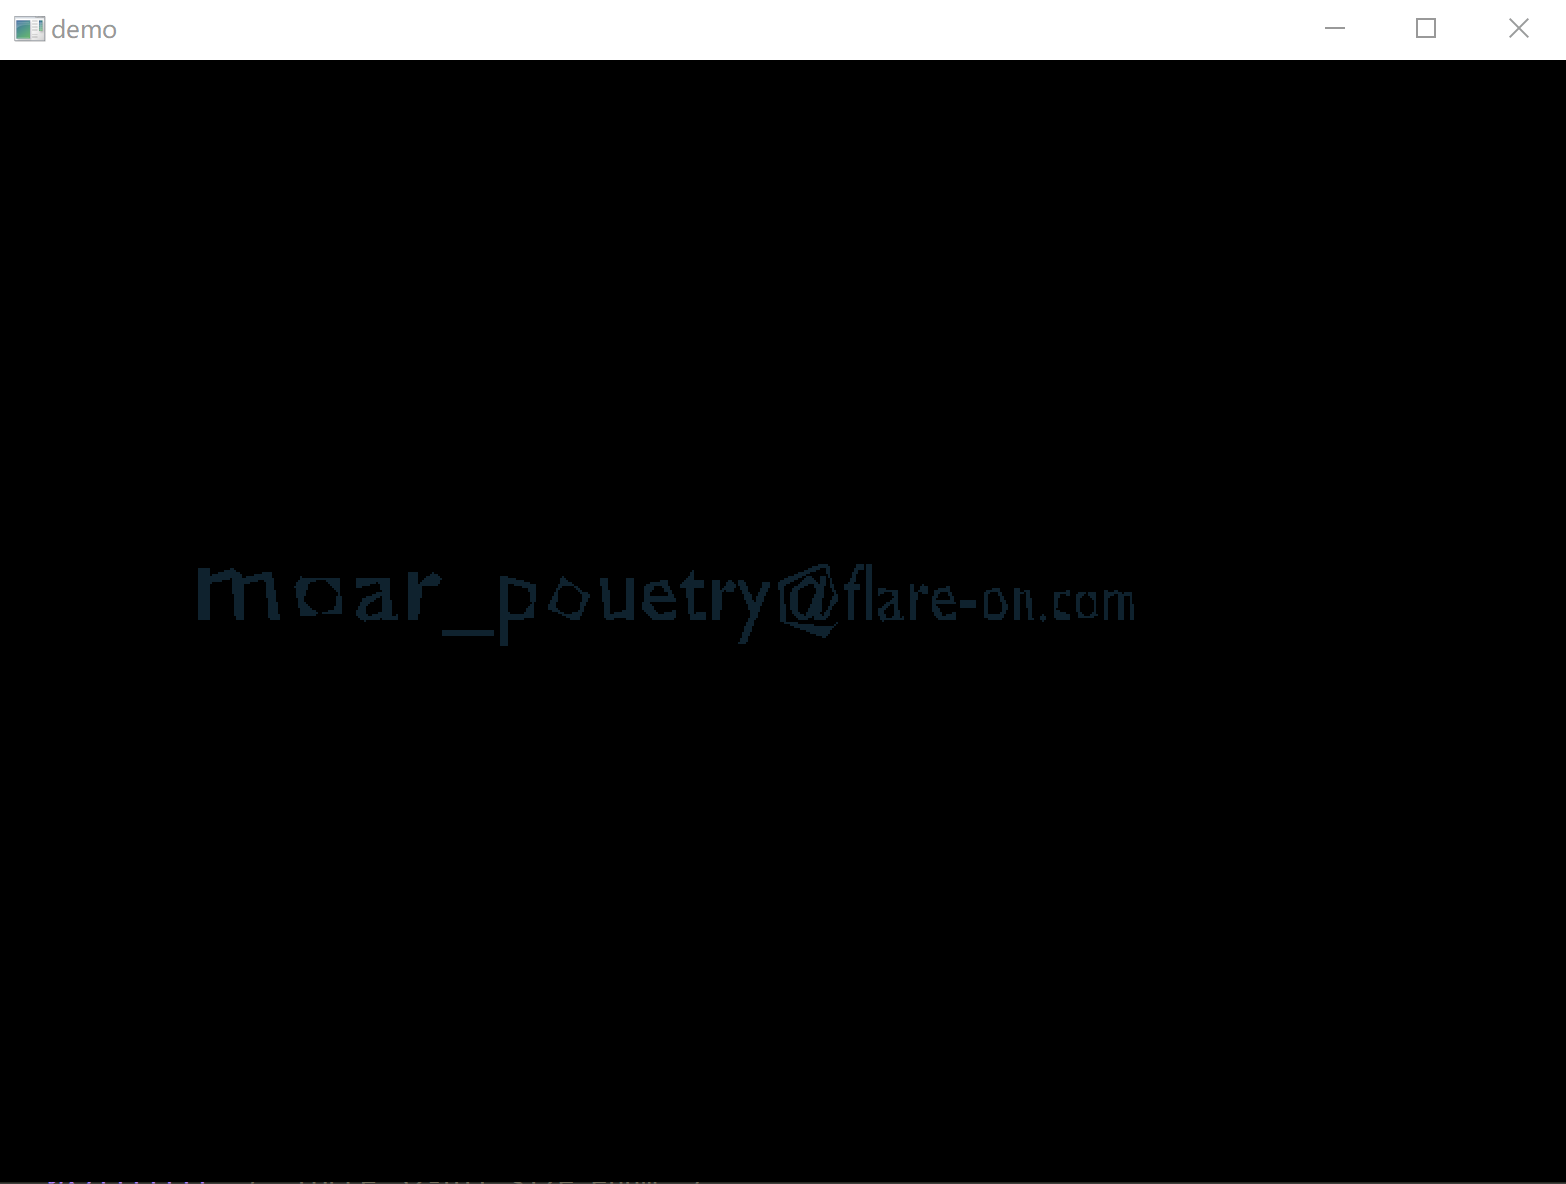
5 - demo demoscense
一个非常cool的程序,通过代码压缩技术把一段动画压缩到超小的文件(这个甚至还有比赛
这个关系到windows 的 directX,先安装上cinst install directx
简单吐槽一下,这题主要时间都费在翻directX的文档上了
由于该代码加壳了(猜测是个压缩壳
所以得先脱壳才能分析,window嘛,直接调,
start定位到004000d3 retn指令
会直接跳转到0x420000继续进行程序的逻辑
跳转过去后,逻辑什么的都能看到了
在查了半天的DirectX文档后,基本确定,下面两个函数是绘图相关的
1
2
(*(*off_430050 + 12 ))(off_430050, 0 ); (*(*off_430054 + 12 ))(off_430054, 0 );
两个渲染,430050是flare-on的mash
430054是flag的mash
但是现在屏幕上只显示出来flare-on logo的图案,怎么让他把flag现实出来呢?
我一开始觉得,这个原因是flare-on的logo覆盖了flag(类似不透明图层),导致flag不能显示出来
于是我patch掉第一个渲染(*(*off_430050 + 12))(off_430050, 0);
发现图案全没了(开始智障之旅= =)
事实证明,我对directX的使用非常不熟悉
在尝试了很久把背景色改透明等等的操作后,我突然想到,为什么我不直接把第一个渲染改成flag的渲染就好了。。。
直接patch program把430050改成430054
得到flag
PS: 从这题开始,算是终于进入flareon有意思的部分了,前四题有点水水的
这题官方还给出别的解法
通过api trace得到directX调用的顺序,然后可以直接dump出图案的model obj,就可以直接用一些软件直接查看了
代码中渲染了flag的图案,至于为什么不能显示出来,是因为设置了transform,移动了图形的位置,此时flag图案的位置摄像机背后,自然无法显示到界面上
6 - bmphide 这题上来就又是一个.net
bmphide.exe可以把一段数据(可以是文本或任意东西),隐藏到一张bmp图片底下
逆了一段时间,大概看到几个关键点
前面调用一个未知函数,里面非常复杂,不知道在干什么,直接看后面
读数据,进行一轮操作变换后,以LSB的方式编码到bmp图片底下
LSB的方式如下
1
2
3
4
5
6
Color pixel = bm.GetPixel(i, j); int red = ((int )pixel.R & 248 ) | ((int )data[num] & 7 );int green = ((int )pixel.G & 248 ) | (data[num] >> 3 & 7 );int blue = ((int )pixel.B & 252 ) | (data[num] >> 6 & 3 );Color color = Color.FromArgb(0 , red, green, blue); bm.SetPixel(i, j, color);
那么,就是怎么逆回来的问题了
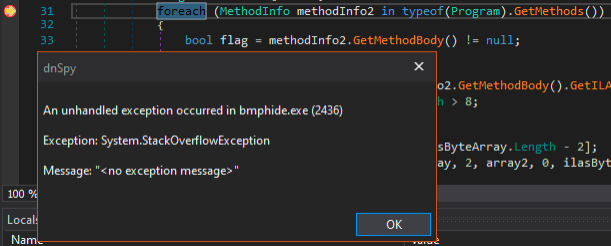
去调了一下代码
???
抛异常了(借用一下官方的图)
调了几遍。似乎还是不知道什么原因,只好静态逆了= =
再仔细看了一下,当中的函数,有很大一部分是不用逆的,他们用于生成中间的index值,直接抄就好了
program a, b, c, d, e, f, g -> getByte
program h -> getByteArray
program i -> change input Bitmap
program j -> getInt
于是写了个逆,跑了一下
。。。
。。。
???
跑出来是乱码,继续改改,好像没什么问题,但是跑出来为什么是乱码
继续细看
这个时候我注意到一个点,有几个类似数据处理的函数定义了,但是没有被调用
同时这4个函数a, b, c, d,ac被调用了,bd没被调用,但是他们的函数类型(参数类型、返回类型)是一样的
因为在写逆的时候发现函数c其实是不可逆的,那么就可以猜测其实在init那个很复杂的函数里面把ac替换成了bd
1
2
d (b, r): right rotate b, r bits b (b, r): left rotate b, r bits
回去细看init中根据函数hash搜索部分的代码,验证了我的想法,他就是替换了两个函数的内容!
那么把逆的ac修改成bd后,再跑
。。。
。。。
???
还是乱码???什么情况
init还有些很奇怪的代码,只能继续看看了
这个时候发现他会调用一些WriteIntPtr、getJit之类的函数,难道他还修改了一些常数?
这个时候还注意到一个点,有个G函数没被调用!他的函数类型跟F是一样的,而F是生成index的关键函数!
看来F也被hook成G了,再结合到getJit上下文,大概就能猜出来修改的是什么常数了
在这里猜的时候,我发现了只要把dnspy一些反反调试机制保护什么的关掉就能调试了,虽然单步好像不太好使,但能让我检验F函数的返回值,的确就是被hook成修改过的G函数了
1
2
3
4
5
6
def programG (idx ): b = ((idx + 1 ) * 309030853 ) & 0xff k = ((idx + 2 ) * 209897853 ) & 0xff return b ^ k
solve.py (代码其实不算长,就不放github了)
1 2 3 4 5 6 7 8 9 10 11 12 13 14 15 16 17 18 19 20 21 22 23 24 25 26 27 28 29 30 31 32 33 34 35 36 37 38 39 40 41 42 43 44 45 46 47 48 49 50 51 52 53 54 55 56 57 58 59 60 61 62 63 64 65 66 67 68 69 70 71 72 73 74 75 76 77 78 79 80 81 82 83 84 85 86 87 88 89 90 91 92 93 94 95 96 97 98 99 100 101 102 103 104 105 106 107 108 109 110 111 112 113 114 115 116 117 118 119 120 121 122 123 124 125 126 127 128 129 130 131 132 133 134 135 136 137 138 139 140 141 142 143 144 145 146 147 148 149 150 151 152 153 154 def getCheckSumTable (): ret = [] for i in range (256 ): num = i for j in range (8 ): num = (1611621881 ^ num >> 1 ) if (num & 1 ) != 0 else num >> 1 ret.append(num) return ret def programA (b, r ): return (b + r ^ r) & 255 def programB (b, r ): for i in range (r): b2 = (b & 128 ) / 128 b = (b * 2 & 0xff ) + b2 return b def programC (b, r ): b2 = 1 for i in range (8 ): if (b & 1 ) == 1 : b2 = (b2 * 2 + 1 & 0xff ) else : b2 = (b2 - 1 & 0xff ) return b2 def programD (b, r ): for i in range (r): b2 = (b & 1 ) * 128 b = (b / 2 & 0xff ) + b2 return b def programE (b, k ): return b ^ k def programF (idx ): array = [121 , 255 , 214 , 60 , 106 , 216 , 149 , 89 , 96 , 29 , 81 , 123 , 182 , 24 , 167 , 252 , 88 , 212 , 43 , 85 , 181 , 86 , 108 , 213 , 50 , 78 , 247 , 83 , 193 , 35 , 135 , 217 , 0 , 64 , 45 , 236 , 134 , 102 , 76 , 74 , 153 , 34 , 39 , 10 , 192 , 202 , 71 , 183 , 185 , 175 , 84 , 118 , 9 , 158 , 66 , 128 , 116 , 117 , 4 , 13 , 46 , 227 , 132 , 240 , 122 , 11 , 18 , 186 , 30 , 157 , 1 , 154 , 144 , 124 , 152 , 187 , 32 , 87 , 141 , 103 , 189 , 12 , 53 , 222 , 206 , 91 , 20 , 174 , 49 , 223 , 155 , 250 , 95 , 31 , 98 , 151 , 179 , 101 , 47 , 17 , 207 , 142 , 199 , 3 , 205 , 163 , 146 , 48 , 165 , 225 , 62 , 33 , 119 , 52 , 241 , 228 , 162 , 90 , 140 , 232 , 129 , 114 , 75 , 82 , 190 , 65 , 2 , 21 , 14 , 111 , 115 , 36 , 107 , 67 , 126 , 80 , 110 , 23 , 44 , 226 , 56 , 7 , 172 , 221 , 239 , 161 , 61 , 93 , 94 , 99 , 171 , 97 , 38 , 40 , 28 , 166 , 209 , 229 , 136 , 130 , 164 , 194 , 243 , 220 , 25 , 169 , 105 , 238 , 245 , 215 , 195 , 203 , 170 , 16 , 109 , 176 , 27 , 184 , 148 , 131 , 210 , 231 , 125 , 177 , 26 , 246 , 127 , 198 , 254 , 6 , 69 , 237 , 197 , 54 , 59 , 137 , 79 , 178 , 139 , 235 , 249 , 230 , 233 , 204 , 196 , 113 , 120 , 173 , 224 , 55 , 92 , 211 , 112 , 219 , 208 , 77 , 191 , 242 , 133 , 244 , 168 , 188 , 138 , 251 , 70 , 150 , 145 , 248 , 180 , 218 , 42 , 15 , 159 , 104 , 22 , 37 , 72 , 63 , 234 , 147 , 200 , 253 , 100 , 19 , 73 , 5 , 57 , 201 , 51 , 156 , 41 , 143 , 68 , 8 , 160 , 58 ] num = 0 num2 = 0 result = 0 for i in range (idx+1 ): num += 1 num %= 256 num2 += array[num] num2 %= 256 array[num], array[num2] = array[num2], array[num] result = array[(array[num] + array[num2]) % 256 ] return result def programG (idx ): b = ((idx + 1 ) * 309030853 ) & 0xff k = ((idx + 2 ) * 209897853 ) & 0xff return b ^ k def programH (in_data ): num = 0 ret = [0 ] * len (in_data) for i in range (len (in_data)): num2 = programG(num) num += 1 num3 = in_data[i] num3 = programE(num3, num2) num3 = programB(num3, 7 ) num4 = programG(num) num += 1 num3 = programE(num3, num4) num3 = programD(num3, 3 ) ret[i] = num3 return ret def programJ (z ): b = 5 num = 0 value = '' bytes_v = '' while True : if b == 1 : num += 4 b += 2 elif b == 2 : num = num * 2738 b += 8 elif b == 3 : num += programF(6 ) b += 1 elif b == 4 : z = programB(z, 1 ) b += 2 elif b == 5 : num = int ('1F7D1482' , 16 ) b -= 3 elif b == 6 : break elif b == 7 : num += int (value) b -= 6 elif b == 10 : bytes_v = 'MzQxOTk=' .decode('base64' ) b += 4 elif b == 14 : value = bytes_v b -= 7 return (z ^ num) & 0xff from PIL import Imagedef extractData (): img = Image.open ('flag.bmp' ).convert('RGB' ) data = [] for i in range (img.width): for j in range (img.height): r, g, b = img.getpixel((i, j)) num = (r & 7 ) | ((g & 7 ) << 3 ) | ((b & 3 ) << 6 ) data.append(num) r, g, b = img.getpixel((0 , 0 )) num = (r & 7 ) | ((g & 7 ) << 3 ) | ((b & 3 ) << 6 ) print num return data def dataDeTranslate (data ): result = [] num = 0 for d in data: num2 = programG(num) num += 1 num4 = programG(num) num += 1 num3 = d num3 = programB(num3, 3 ) num3 ^= num4 num3 = programD(num3, 7 ) num3 ^= num2 result.append(num3 & 0xff ) with open ('flag2.bmp' , 'wb' ) as f: f.write('' .join(map (chr , result))) data = extractData() dataDeTranslate(data)
处理运行得到flag.bmp
还是一张普通的图,再把flag.bmp输入得到flag2.bmp,得到真正的flag
PS: 这题算是.net的骚操作了,对.net完全不熟,真的脑壳疼,全程靠猜
至于为什么不能调试,这其实又是.net的一个骚操作
根据官方writeup,这是一个anti-debug,没太看懂是什么原理,似乎他是会把getJit hook加上IncrementMaxStack,但是还是没懂为什么就抛异常了
然后把dnspy的反反调试去掉就又好了
官方的一种解法很值得我们学习:
Black Box Analysis
通过对黑盒输入空白图片,统计输出规律,进行暴力破解还原隐藏的byte
详细方法可参考官方题解
https://www.fireeye.com/content/dam/fireeye-www/blog/pdfs/FlareOn6_Challenge6_Solution_BMPHIDE.pdf
官方的另一种解法就是通过写逆了
7 - wopr 这题乍一看不知道什么鬼,但其实看一下搜到的strings就能发现许多python相关的字符串
可以推断出用的pyinstaller打的包
通过https://github.com/countercept/python-exe-unpacker提取出pyc
提取出来要注意这是python3的pyc,有些pyc缺少了文件头,需要自己加上,有些不用,不然用uncompyle6不能反编译
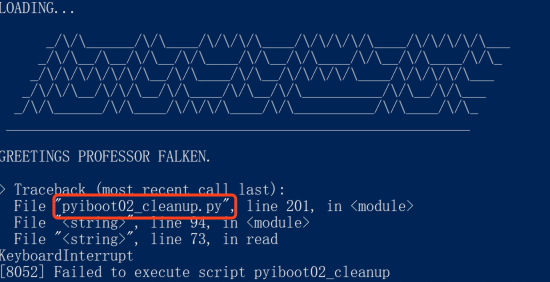
但是extract出来一大堆文件,里面还包含不少库文件,怎么定位到到底是哪个文件呢?这个提取出来不像别的包含跟exe同名的script
我用的方法非常简单,跑起来,ctrl+c
然后给cleanup加上pyc header,这里注意python的版本,在extract的时候可以得到
header = [0x42, 0x0d, 0x0d, 0x0a, 0x00, 0x00, 0x00, 0x00, 0x00, 0x00, 0x00, 0x00, 0x00, 0x00, 0x00, 0x00]
他会通过
code = lzma.decompress(fire(eye(__doc__.encode()), *bytes*([i]) + BOUNCE))
提取出隐藏的代码。里面许多函数不需要逆,直接cv了用就好
但这里直接跑是拿不到code的
注意__doc__.encode(),从doc里拿到的全是空格,怎么可能包含数据,这种tricks以前就遇到过了,用tab+space的组合隐藏数据,直接查看pyc的确能看到一大堆tab+space组合的数据,看来是uncompyle6把数据抹掉了
直接提出来就拿到真实跑的代码了
然后就能发现一堆约束,直接用z3解就完事了
其中一个关键的key是binary的代码段md5,要先计算出reloc固定的偏移,原代码中是直接搜索本进程的内存,想要直接沿用代码,必须注入进去,这步似乎挺麻烦的,因为我直接理解后手动计算了
1 2 3 4 5 6 7 8 9 10 11 12 13 14 15 16 17 18 19 20 21 22 23 24 25 26 27 28 29 30 31 32 33 34 35 36 37 38 39 40 41 42 43 44 45 46 47 48 49 50 51 52 53 54 55 56 57 58 59 60 61 62 63 64 65 66 67 68 69 70 71 72 73 74 75 76 77 78 79 80 81 82 83 84 85 86 87 88 89 90 91 92 93 94 95 96 97 98 99 100 101 102 103 104 105 106 107 108 109 import hashlibfrom z3 import *import structdef patchText (data, reloc, base ): e = 0 textvaddr = 0x1000 while e <= len (reloc) - 8 : addr, size = struct.unpack_from('=II' , reloc, e) if addr == 0 and size == 0 : break slot = reloc[e+8 : e+size] for i in range (len (slot) >> 1 ): value, = struct.unpack_from('=H' , slot, 2 *i) f = value >> 12 if f != 3 : continue value = value & 0xfff ready = addr + value - textvaddr if 0 <= ready < len (data): struct.pack_into('=I' , data, ready, (struct.unpack_from('=I' , data, ready)[0 ] - base)) e += size return data def getH (): data = open ('7 - wopr/wopr.exe' , 'rb' ).read() textdata = data[0x400 :0x400 +0x1f224 ] reloc = data[0x49a00 :0x49a00 +0x17b8 ] data = patchText(bytearray (textdata), bytearray (reloc), 0x400000 ) return hashlib.md5(data).digest() def solve (h ): x = [BitVec('x' +str (i), 8 ) for i in range (16 )] s = Solver() s.add(h[0 ] == x[2 ] ^ x[3 ] ^ x[4 ] ^ x[8 ] ^ x[11 ] ^ x[14 ]) s.add(h[1 ] == x[0 ] ^ x[1 ] ^ x[8 ] ^ x[11 ] ^ x[13 ] ^ x[14 ]) s.add(h[2 ] == x[0 ] ^ x[1 ] ^ x[2 ] ^ x[4 ] ^ x[5 ] ^ x[8 ] ^ x[9 ] ^ x[10 ] ^ x[13 ] ^ x[14 ] ^ x[15 ]) s.add(h[3 ] == x[5 ] ^ x[6 ] ^ x[8 ] ^ x[9 ] ^ x[10 ] ^ x[12 ] ^ x[15 ]) s.add(h[4 ] == x[1 ] ^ x[6 ] ^ x[7 ] ^ x[8 ] ^ x[12 ] ^ x[13 ] ^ x[14 ] ^ x[15 ]) s.add(h[5 ] == x[0 ] ^ x[4 ] ^ x[7 ] ^ x[8 ] ^ x[9 ] ^ x[10 ] ^ x[12 ] ^ x[13 ] ^ x[14 ] ^ x[15 ]) s.add(h[6 ] == x[1 ] ^ x[3 ] ^ x[7 ] ^ x[9 ] ^ x[10 ] ^ x[11 ] ^ x[12 ] ^ x[13 ] ^ x[15 ]) s.add(h[7 ] == x[0 ] ^ x[1 ] ^ x[2 ] ^ x[3 ] ^ x[4 ] ^ x[8 ] ^ x[10 ] ^ x[11 ] ^ x[14 ]) s.add(h[8 ] == x[1 ] ^ x[2 ] ^ x[3 ] ^ x[5 ] ^ x[9 ] ^ x[10 ] ^ x[11 ] ^ x[12 ]) s.add(h[9 ] == x[6 ] ^ x[7 ] ^ x[8 ] ^ x[10 ] ^ x[11 ] ^ x[12 ] ^ x[15 ]) s.add(h[10 ] == x[0 ] ^ x[3 ] ^ x[4 ] ^ x[7 ] ^ x[8 ] ^ x[10 ] ^ x[11 ] ^ x[12 ] ^ x[13 ] ^ x[14 ] ^ x[15 ]) s.add(h[11 ] == x[0 ] ^ x[2 ] ^ x[4 ] ^ x[6 ] ^ x[13 ]) s.add(h[12 ] == x[0 ] ^ x[3 ] ^ x[6 ] ^ x[7 ] ^ x[10 ] ^ x[12 ] ^ x[15 ]) s.add(h[13 ] == x[2 ] ^ x[3 ] ^ x[4 ] ^ x[5 ] ^ x[6 ] ^ x[7 ] ^ x[11 ] ^ x[12 ] ^ x[13 ] ^ x[14 ]) s.add(h[14 ] == x[1 ] ^ x[2 ] ^ x[3 ] ^ x[5 ] ^ x[7 ] ^ x[11 ] ^ x[13 ] ^ x[14 ] ^ x[15 ]) s.add(h[15 ] == x[1 ] ^ x[3 ] ^ x[5 ] ^ x[9 ] ^ x[10 ] ^ x[11 ] ^ x[13 ] ^ x[15 ]) s.check() result = s.model() return [result.get_interp(x[i]).as_long() for i in range (16 )] def fire (wood, bounce ): meaning = bytearray (wood) bounce = bytearray (bounce) regard = len (bounce) manage = list (range (256 )) def prospect (*financial ): return sum (financial) % 256 def blade (feel, cassette ): cassette = prospect(cassette, manage[feel]) manage[feel], manage[cassette] = manage[cassette], manage[feel] return cassette cassette = 0 for feel in range (256 ): cassette = prospect(cassette, bounce[(feel % regard)]) cassette = blade(feel, cassette) cassette = 0 for pigeon, _ in enumerate (meaning): feel = prospect(pigeon, 1 ) cassette = blade(feel, cassette) meaning[pigeon] ^= manage[prospect(manage[feel], manage[cassette])] return bytes (meaning) def getFlag (x ): eye = [219 , 232 , 81 , 150 , 126 , 54 , 116 , 129 , 3 , 61 , 204 , 119 , 252 , 122 , 3 , 209 , 196 , 15 , 148 , 173 , 206 , 246 , 242 , 200 , 201 , 167 , 2 , 102 , 59 , 122 , 81 , 6 , 24 , 23 ] flag = fire(eye, x).decode() return flag if __name__ == "__main__" : xor = [212 , 162 , 242 , 218 , 101 , 109 , 50 , 31 , 125 , 112 , 249 , 83 , 55 , 187 , 131 , 206 ] h = getH() h = [ord (h[i]) ^ xor[i] for i in range (16 )] x = solve(h) print '' .join(map (chr , x)) print getFlag(x)
PS: 这题官方的解法中规中矩,没有太特别的地方
看了一下别人的解法,是直接dump memory修改了一下代码直接用的
flag是 L1n34R_4L93bR4_i5_FuN@flare-on.com
emmm?linear algebra? 🙃
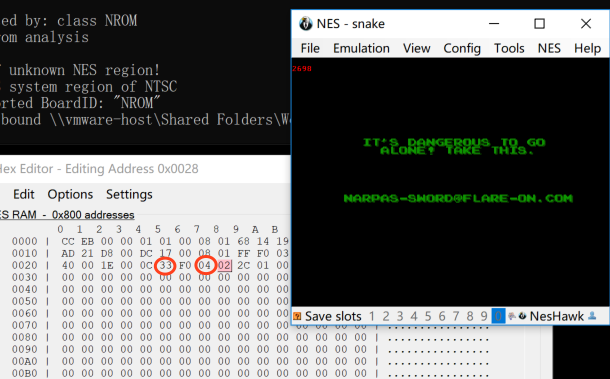
8 - snake 居然是个nes的镜像
找了一些资料
http://wiki.nesdev.com/w/index.php/Bad_Apple
http://wiki.nesdev.com/w/index.php/Emulators
然后选择了一款看着挺好用的模拟器
FCEUX emulator
有点像cheat Engine的做法
可以在内存中搜索值,然后可以定位到吃苹果的个数,也就是分数值
在那个内存设定break in read
就可以在吃到苹果的一刻断下,查看附近代码,能看到两个关键点
cmp 0x33 和 cmp 0x4
然后修改内存后,flag就出来了
1
2
0x0025: 吃的苹果个数 0x33时进行下一关 0x0027: 当前速度(关卡?) 0x04时...flag出来了
PS: 这题是真的很简单呀
在twitter上看到有人真的靠玩出来的😂 tqltql
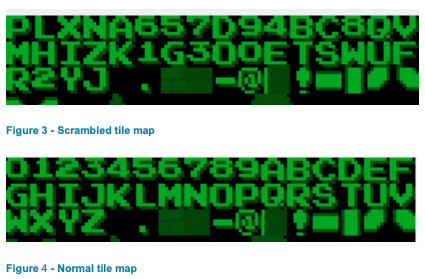
官方还提到一种做法,是跟NES的PPU data相关的
Nes把图案显示到屏幕,是通过把像下面的title map写到PPU Name Table上的
map的时候,按下面Normal title map,0-9A-Z应该是对应着从数字0数到35,但是通过模拟器的PPU viewer,可以看到他被打乱的,同时通过调试可以看到他还做了一些小混淆,计算显示时把data-0x10,所以通过这种方法恢复后,就可以直接从binary中搜到flag了
9 - reloadered main逻辑很简单,但是还原不出来flag
拿其中一个有效flag输入是显示错误的(wrong key),但是在调试的时候则显示正确
message提到
I hear that it caused problems when trying to analyze it with ghidra.
似乎用ghidra分析会报异常?
不过用ida没事
并且用OD调试的时候,发现在原main逻辑代码底下有另外一套相似的代码,也包含wrong key
看来,程序应该是做了一些有趣的骚操作
尝试了几次,发现了一个东西,就是我反复执行的时候,有时候显示的UI界面不一样!
有时包含logo,有时只有单独一行字符
尝试了一下,捉摸不到显示的规律,结合ida分析,一开始分析的代码应该是包含logo的那个
不知道是什么原理,直接在ida中搜索找不到相关的代码
检查了一下md5,binary是一直没有任何修改的
换种调试方法
直接启动后,通过attach上去调试
发现其rebase到0x0010000的位置
在0x112D0发现奇怪的代码,里面还包含了GetModuleHandleA(0)的函数
大致看了一下是直接在进程了修改了相关代码,运行完以后直接就一大片nop掉了
前面还看到了反调试的代码,还有很多不知道什么check,但是不重要,因为我们已经拿到代码了
代码非常简单,跟前面的逻辑差不多
直接就能解出来flag了
PS: 89这两题,感觉就有点过于简单了
但是对于这题,背后实现原理远比解题要有意思
为什么会显示不同的逻辑?
首先,正常逻辑包含有几部分的代码
anti-vm, anti-debug, decoding, testing the password
而关键位置anti-vm部分是通过时间检测实现的,这是个非常玄的检测方式,这也就说明了直接跑为什么有时会显示正常逻辑,有时候会显示假逻辑
但是直接从start分析也没那么好分析
隐藏函数在0x112d0的偏移,但是跳转过去会查看到一大片nop
官方wp没有详细说明这个函数是怎么生成的
似乎是跟base relocation table有关?
事实是,这跟PE的加载机制有关,这片代码不是从start的地方生成的,只要binary加载到内存上就会生成这片代码
具体查看https://corkamiwiki.github.io/PE#relocations
文档也给出了实现代码https://github.com/angea/corkami/blob/master/src/PE/reloccrypt.asm
看了一下,没太看懂= =,这应该算是一种基于PE loader操作的加密方式
10 - Mugatu 这题一开始分析的时候看得我一头雾水,各种api乱调用的感觉
行吧,调试看看,结果一调试发现,实际的import table跟显示出来的不一样!
看来是做了些混淆
对PE不熟悉,手动根据调试信息恢复了一下导入表,总算能正常静态分析了
首先,这是一个勒索病毒,会把gif图片加密
但是直接分析没什么特别的头绪,程序从资源中加载了两张图片,分别为G和F
那么这两张什么图片呢?
直接debug跟踪了一下,把图片数据dump了出来,发现。。。F在用BitBlt的xor处理完后是个dll
总结一下是这么个操作
1
2
3
4
5
6
7
8
9
1. 获取本地信息Src 2. http get获得xml,把本地信息Src与title进行循环xor得到SrcXor 3. 组成packet: 0x1FACEEEE | Size | SrcXor , 进行base64编码,得到Base64Packet 4. 获取到到pubdata作为http包additional header,把Base64Packet作为数据post到mugatu.flare-on.com 5. 返回数据进行base64解码,并检查header xor 0x4D是否为"orange mocha frappuccino",若是,则写到文件`\\.\mailslot\Let_me_show_you_Derelicte` 6. 从binary load image g和f,用gdi32_BitBlt两张图片xor,并用gdi32_GetObjectW提取信息, 7. data段数据,VirtualProtect 修改成 rwx,没细看,image_f 包含一个dll数据 8. createThread,调用dll的导出函数, ...
然后就可以去分析dll了
这个dll也做了跟exe一样的import table混淆
结合调试,得到参数结构体的数据
就是从硬盘中搜索gif并加密
加密函数看了看,非常眼熟,😯是个xtea
但是密钥是刚开始的时候访问网络得到的,那个是个现在已经访问不了的url
但题目还有个提示,文件the_key_to_success_0000.gif.Mugatu
直接解出来
密钥是4个byte的,这么就3个byte直接爆破了
得到flag
PS: 这gif图怎么这么骚气!(Dear God…It’s beautiful)
这题有意思的地方应该是在import table混淆上
emmmm 看了一下官方wp,原来这个混淆是这么简单,在WinMain调用之前,start的最开始调用了一个函数,把import address table(IAT)翻转了。。。因为反编译器通常都不会处理这种情况
至于怎么去混淆,也不用像我这么蠢手动恢复,直接在跑起来后dump memory再分析就好了
11 - vv_max 这题就有意思了,上来先给你来个AVX2指令集
先检查一下CPU支不支持AVX2,然后就开始了程序的逻辑
大概看出来像是个VM,对那个贼大的结构体恢复了一下
1
2
3
4
5
6
7
8
9
10
11
12
13
14
15
16
17
struct YMM { char value[32 ]; }; struct VM { char text[2048 ]; YMM reg[32 ]; QWORD rip; void *funclist[24 ]; char data[1848 ]; };
然后看了半天的文档,写了个反汇编器
1 2 3 4 5 6 7 8 9 10 11 12 13 14 15 16 17 18 19 20 21 22 23 24 25 26 27 28 29 30 31 32 33 34 35 36 37 38 39 40 41 42 43 44 45 46 47 48 49 50 51 52 53 54 55 56 57 58 59 60 61 62 63 64 65 66 67 68 69 70 71 72 73 74 75 76 77 78 79 80 81 82 83 84 85 86 87 88 89 90 91 92 93 94 95 96 97 98 99 100 101 102 103 104 105 106 107 108 109 110 111 112 113 114 115 116 117 118 119 120 121 122 123 124 125 126 def disasm (text ): f = open ('dis.txt' , 'w' ) ip = 0 while ip < len (text): f.write('{}: ' .format (ip)) if ip > 2 and ip < 32 +3 : ip += 1 f.write('reserve INPUT1\n' ) elif ip >= 37 and ip < 37 + 32 : ip += 1 f.write('reserve INPUT2\n' ) elif text[ip] == 0 : ip += 1 f.write('EmptyReg\n' ) elif text[ip] == 1 : param1, param2, param3 = text[ip+1 ], text[ip+2 ], text[ip+3 ] ip += 4 f.write('muladd16 r{}, r{}, r{}\n' .format (param1, param2, param3)) elif text[ip] == 2 : param1, param2, param3 = text[ip+1 ], text[ip+2 ], text[ip+3 ] ip += 4 f.write('muladd32 r{}, r{}, r{}\n' .format (param1, param2, param3)) elif text[ip] == 3 : param1, param2, param3 = text[ip+1 ], text[ip+2 ], text[ip+3 ] ip += 4 f.write('xor r{}, r{}, r{}\n' .format (param1, param2, param3)) elif text[ip] == 4 : param1, param2, param3 = text[ip+1 ], text[ip+2 ], text[ip+3 ] ip += 4 f.write('or r{}, r{}, r{}\n' .format (param1, param2, param3)) elif text[ip] == 5 : param1, param2, param3 = text[ip+1 ], text[ip+2 ], text[ip+3 ] ip += 4 f.write('and r{}, r{}, r{}\n' .format (param1, param2, param3)) elif text[ip] == 6 : param1, param2 = text[ip+1 ], text[ip+2 ] ip += 3 f.write('not r{}, r{}\n' .format (param1, param2)) elif text[ip] == 7 : param1, param2, param3 = text[ip+1 ], text[ip+2 ], text[ip+3 ] ip += 4 f.write('add8 r{}, r{}, r{}\n' .format (param1, param2, param3)) elif text[ip] == 8 : param1, param2, param3 = text[ip+1 ], text[ip+2 ], text[ip+3 ] ip += 4 f.write('sub8 r{}, r{}, r{} # p1 = p2 - p3\n' .format (param1, param2, param3)) elif text[ip] == 9 : param1, param2, param3 = text[ip+1 ], text[ip+2 ], text[ip+3 ] ip += 4 f.write('add16 r{}, r{}, r{}\n' .format (param1, param2, param3)) elif text[ip] == 10 : param1, param2, param3 = text[ip+1 ], text[ip+2 ], text[ip+3 ] ip += 4 f.write('sub16 r{}, r{}, r{}\n' .format (param1, param2, param3)) elif text[ip] == 11 : param1, param2, param3 = text[ip+1 ], text[ip+2 ], text[ip+3 ] ip += 4 f.write('add32 r{}, r{}, r{}\n' .format (param1, param2, param3)) elif text[ip] == 12 : param1, param2, param3 = text[ip+1 ], text[ip+2 ], text[ip+3 ] ip += 4 f.write('sub32 r{}, r{}, r{}\n' .format (param1, param2, param3)) elif text[ip] == 13 : param1, param2, param3 = text[ip+1 ], text[ip+2 ], text[ip+3 ] ip += 4 f.write('add64 r{}, r{}, r{}\n' .format (param1, param2, param3)) elif text[ip] == 14 : param1, param2, param3 = text[ip+1 ], text[ip+2 ], text[ip+3 ] ip += 4 f.write('sub64 r{}, r{}, r{}\n' .format (param1, param2, param3)) elif text[ip] == 15 : param1, param2, param3 = text[ip+1 ], text[ip+2 ], text[ip+3 ] ip += 4 f.write('muldq r{}, r{}, r{}\n' .format (param1, param2, param3)) elif text[ip] == 16 : param1, param2 = text[ip+1 ], text[ip+2 ] ip += 3 f.write('movdq r{}, r{}\n' .format (param1, param2)) elif text[ip] == 17 : param1 = text[ip+1 ] ip += 2 f.write('movdq r{}, mem[{}]\n' .format (param1, ip)) array = [text[ip + j] for j in range (32 )] f.write('\t({}-{}): ' .format (ip, ip+32 ) + str (array) + '\n' ) ip += 32 elif text[ip] == 18 : param1, param2, param3 = text[ip+1 ], text[ip+2 ], text[ip+3 ] ip += 4 f.write('srld r{}, r{}, {}\n' .format (param1, param2, param3)) elif text[ip] == 19 : param1, param2, param3 = text[ip+1 ], text[ip+2 ], text[ip+3 ] ip += 4 f.write('slld r{}, r{}, {}\n' .format (param1, param2, param3)) elif text[ip] == 20 : param1, param2, param3 = text[ip+1 ], text[ip+2 ], text[ip+3 ] ip += 4 f.write('shufb r{}, r{}, r{}\n' .format (param1, param2, param3)) elif text[ip] == 21 : param1, param2, param3 = text[ip+1 ], text[ip+2 ], text[ip+3 ] ip += 4 f.write('permd r{}, r{}, r{}\n' .format (param1, param3, param2)) elif text[ip] == 22 : param1, param2, param3 = text[ip+1 ], text[ip+2 ], text[ip+3 ] ip += 4 f.write('cmpeq r{}, r{}, r{}\n' .format (param1, param2, param3)) elif text[ip] == 23 : ip += 1 f.write('nop\n' ) elif text[ip] == 0xff : ip += 1 f.write('exit\n' ) else : f.write('unknown: {}' .format (text[ip])) ip += 1 f.close() if __name__ == "__main__" : text = open ('text.bin' , 'r' ).read() text = map (ord , text) disasm(text)
然后就是要去逆这个东西了
总结了一下最后检查部分的要求
1
2
3
4
final check: 1. reg2 == reg20 2. input1[:9] == 'FLARE2019' flag = reg1 xor reg31
其中,R20是个固定的数组,可以直接从调试中获得
R2跟我们的输入有关,接下来就是看R2到底进行了哪些操作了
1
2
3
4
5
6
7
8
9
10
11
12
13
781: srld r7, r1, 4 813: and r7, r7, r6 849: cmpeq r8, r1, r6 // 0000000 ? 889: add8 r7, r8, r7 // equal - 1 / not equal = 0 901: shufb r7, r5, r7 949: add8 r2, r1, r7 1029: muladd16 r7, r2, r10 1109: muladd32 r2, r7, r11 1297: shufb r2, r2, r12 1421: permd r2, r13, r2 1029: muladd16 r7, r2, r10 1109: muladd32 r2, r7, r11
主要翻了半天文档,去理解这些指令
刚开始我打算直接写Z3跑的,但在理解了这些指令的运算后,感觉好像没那么好写?
而且关键是,这指令的个数不多,应该可以直接写逆
但是这时有个关键点,muladd这种指令不好写逆
这时,我注意到一个东西,因为当中包含有常数数组,所以结合起来有如下的特点
1
2
3
muladd32: r2[31:0] = 0x1000 * r7[15:0] + r7[31:16] = r2[7:0] << 18 + r2[15:8] << 12 + r2[23:16] << 6 + r2[31:24]
6,12,18,24
每一段只占6个bit
这让我想起了base64
但是结合上下文我根本看不出来这是一个base64算法,因为还有一些奇怪的操作
但这时我从网上搜到这篇,用AVX2实现base64算法https://arxiv.org/pdf/1704.00605.pdf
哦对!我还可以调试,直接当成黑盒看一下输入输出的关系
然后就发现。。。
这是一个base64 decode
然后就出来了
1
2
3
.\vv_max.exe FLARE2019 cHCyrAHSXmEKpyqoCByGGuhFyCmy86Ee That is correct! Flag: AVX2_VM_M4K3S_BASE64_C0MPL1C4T3D@flare-on.com
PS: 骚操作真多
这题官方解法没有很特别的地方
以后遇到这些算法就学会了,先当成黑盒去猜,然后再去逆
12 - help 这是我做过最最最最难的一道题了!前面11道题,基本花费时间都不会超过两天,这题,断断续续抽空做弄了足足20天!我真是太太太太太菜了,但真的学到了非常多
首先说说这题吧,给了一个window的crash dump文件,大小2G,然后还有一个pacp
翻了一遍,发现一堆一堆的192.168.1.244和192.168.1.243的TCP交互数据,但是看不出来是啥数据
有一堆以8 bytes重复的字符
还看到了一些正常http访问的数据包
那么就去分析crash dump文件吧
因为之前没有弄过,所以先去网上搜了一波,用windbg拿到了一些信息
1
2
3
4
5
6
7
8
9
Windows 7 Kernel Version 7601 (Service Pack 1) UP Free x64 Product: WinNt, suite: TerminalServer SingleUserTS Personal Built by: 7601.18741.amd64fre.win7sp1_gdr.150202-1526 ... BugCheck 7E, {ffffffffc0000005, fffffa8003f9c621, fffff88007c6b958, fffff88007c6b1b0} *** WARNING: Unable to verify timestamp for man.sys *** ERROR: Module load completed but symbols could not be loaded for man.sys Probably caused by : man.sys ( man+1ce7 )
看起来,问题出在了man.sys这个文件上,因为题目描述说道是病毒文件存在bug把电脑搞崩了
那么怎么分析这个文件呢
有一个很出名的工具叫volatility
1 volatility.exe -f '.\12 - help\help.dmp' --profile=Win7SP1x64 modscan > .\ana\modscan
Then I found man.sys by modscan.
But when I try to dump this file,
volatility.exe -f '.\12 - help\help.dmp' --profile=Win7SP1x64 moddump -D dump2 --regex=man.sys
I got0xfffff880033bc000 man.sys Error: e_magic 0000 is not a valid DOS signature.
emmmmm 这个文件的文件头似乎被抹掉了
然后就发现可以用volshell dump出来
https://lists.volatilityfoundation.org/pipermail/vol-users/2013-March/000829.html
1
2
3
>>> data = addrspace().zread(assumed_base_address, assumed_module_size)>>> with open ('file.dmp' , 'wb' ) as f:...... f.write(data)
dump出来后,因为没有文件头,分析不了
后来我发现ghidra可以直接识别到函数,所以就用ghidra做了(后来别人告诉我其实ida也可以的,不过只是要在初始化时选一个参数)
这样我就不用一个个找0x55然后C了
因为刚开始只有一个去掉文件头的man.sys
我当时在想里面会不会藏有什么东西,就试着binwalk了一下,果然发现了一个dll文件
根据pdb字符串,这个就叫m.dll
e:\dropbox\dropbox\flareon_2019\code\cd\objchk_win7_amd64\amd64\m.pdb
分析m.dll,去掉RC4的混淆,逆完发现他是在本地监听4444端口,然后根据发送过来的数据包调用相应的ioctl
看来还是得继续逆man.sys
man.sys好多奇怪的操作
emmmmm 还有好多疑似import的函数
emmmm 这个地址,是什么函数呢?
啊!我能直接通过windbg查看!
这么就能一个个恢复出来了
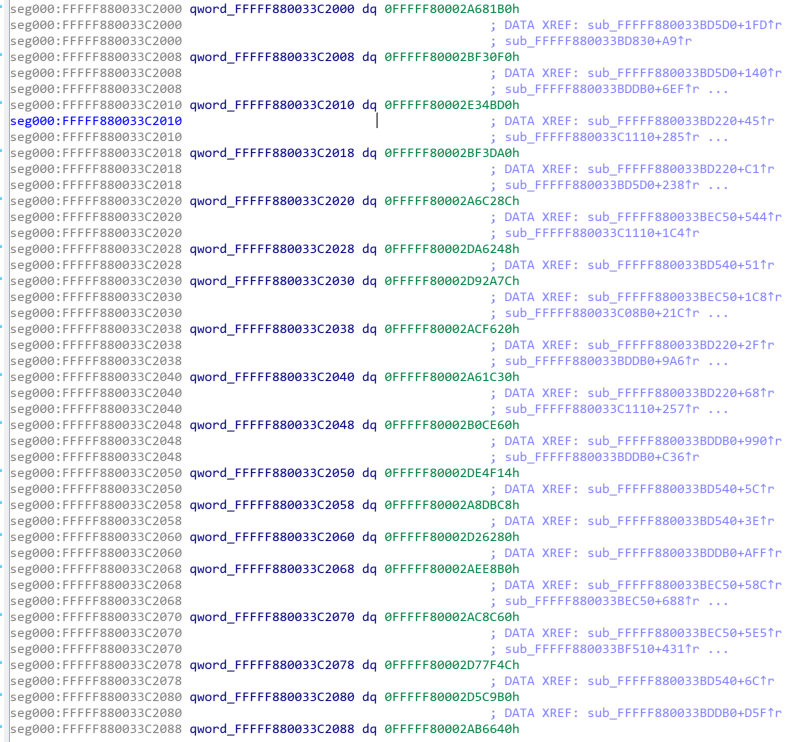
花了比较长的时间去逆man.sys,主要注意到他的ioctl的操作,都是从一个链表中搜索代码出来调用,调用的似乎都是export函数
在man.sys初始化的时候,会通过同样的函数调用m.dll的export函数,从而在本地开启4444端口监听
那么就计划先来分析一下4444端口接收到的数据进行了什么ioctl的调用吧
诶??这数据完全对不上??
我是哪里弄错了吗?
卡了一轮,无果,我以为我是开头哪里搞错了
上twitter问了一下大佬@hasherezade
How many DLLs did you extract? There is one dll which functionality is to encrypt the traffic…
emmmmmm
我太菜了
好的,然后我就知道往哪个方向去继续做了
我用volatility把基本能跑的都跑了一遍,似乎好像没发现什么特别的东西
在driver、module相关的信息里面倒是看到挺多flare on字样的驱动等等,但是似乎都提不出来,定位不到文件
这时看回man.sys,我主要到一个东西,加载的m.dll是要先attach到pid=876的进程上!
然后去查看pid 876,是svchost.exe,针对这个进程,emmmmm各种方法都找不到那些隐藏的dll
然后试着用yarascan命令搜了一下driver的ID FLID
突然发现,在附近带有pdb的字符串!,我可以直接搜索pdb!
volatility.exe -f '.\12 - help\help.dmp' --profile=Win7SP1x64 yarascan -Y dropbox\\dropbox\\flareon_2019\\code --pid=876 > .\ana\yarascan_code
Jesus…
1
2
3
4
5
6
7
8
9
24d0a4 E:\Dropbox\Dropbox\flareon_2019\code\stmedit\sys\x64\Release\stmedit.pdb 2934fc e:\dropbox\dropbox\flareon_2019\code\cryptodll\objchk_win7_amd64\amd64\c.pdb 29650c e:\dropbox\dropbox\flareon_2019\code\networkdll\objchk_win7_amd64\amd64\n.pdb 2a0508 e:\dropbox\dropbox\flareon_2019\code\keylogdll\objchk_win7_amd64\amd64\k.pdb 2a74fc e:\dropbox\dropbox\flareon_2019\code\screenshotdll\objchk_win7_amd64\amd64\s.pdb 2ac4fc e:\dropbox\dropbox\flareon_2019\code\filedll\objchk_win7_amd64\amd64\f.pdb 6cbe124 e:\dropbox\dropbox\flareon_2019\code\id\objchk_win7_amd64\amd64\man.pdb 6cbf600 e:\dropbox\dropbox\flareon_2019\code\cd\objchk_win7_amd64\amd64\m.pdb 1af27b80 e:\dropbox\dropbox\flareon_2019\code\shellcodedriver\objchk_wxp_x86\i386\driver1.pdb
然后我就结合binwalk把这些都dump出来了
注意到他们目录名称非常有意思
stmedit cryptodll networkdll keylogdll screenshotdll filedll shellcodedriver
刚开始我完全没看懂stmedit是什么东西,逆了一下完全没看懂,非常复杂
然后我去搜了一下……搜到了一个同名的MS的driver example
https://github.com/microsoft/Windows-driver-samples/tree/master/network/trans/stmedit
原来这就是那个加密TCP流的driver!
他通过WPF的api替换TCP上的数据
结合这MS的sample逆了大半天,终于找到那个关键的函数了,是一个8bytes密钥的xor
并且,能从这个sys里面找到初始化4444端口的密钥,但是别的端口都是通过ioctl配置的,根本找不到密钥
先解4444端口的好了
刚开始我想沿用第4题的方法,同scapy提出来,但是存在一个问题,数据太多TCP包被拆分了,需要TCP重组,然后又是查了半天的资料,后来发现直接用wireshark就可以提出来了= =
然后就把4444端口的数据解出来了
首先,数据大量调用了0xd180dab5的ioCode
解析出来的数据类似下面
1 {'buf': 'GG\xda\xbe\x00\x00\x00\x00\x00\x00\x00\x00\x00\x00\x00\x00\x00\x00', 'ioCode': '0xd180dab5', 'size': 26}
结合man.sys可以猜测这是远程发送控制调用相应的函数,其中buf的前4个byte是指明调用的哪个dll,但是我找不到这些值是在哪里初始化的,也就是说我并不知道他这调用了哪个函数
先总结一下前面提取出来的dll的作用,很快就逆了一遍,这都不难
1
2
3
4
5
6
7
8
9
stmedit.sys: TCP包加密 c.dll: 数据加密,先用lznt1压缩,再用rc4加密,密钥是username 'FLARE ON 2019\x00' n.dll: 数据打包,发送到ip 192.268.1.243 k.dll: 键盘记录,保存并打包 s.dll: 屏幕截图,bmp格式 f.dll: 文件操作,读文件,文件搜索,文件写等 man.sys: 控制driver m.dll: 4444监听端口 driver1.sys: 执行shellcode
于是总结了一下数据包
4444接受发送来的数据
6666 7777 8888 都是发送到ip 192.268.1.243的数据
其中7777dump出来的数据包非常有规律,正是8byte的循环,虽然上面dll还有个数据加密的dll,但7777没有用到
后面再细逆man.sys就会发现,在dll的函数调用完毕后,会有一个设置的标志位,只有设置了那个标志位的数据,才会调用c.dll进行数据加密
6666 8888传输的数据均经过加密,而7777则没有
因为4444数据中包含了接收文件的操作,和有显示出来的字符串C:\\keypass\\keys.kdb,可以确定几个man.sys调用的函数
4444接收的文件我dump出来看了一下,其实正是driver1.sys,这个我们已经分析过了
而那个字符串,结合调用的f.dll逆,可以发现他的操作是
在C盘搜索keys.kdb文件
发送keys.kdb文件出去
那么6666 7777 8888 端口的数据我们就能猜测一下,分别是发送的key.kdb数据,屏幕截图数据和键盘记录数据
其中7777的数据量最大,数据包最多,可以先猜测这是屏幕截图数据
因为只是xor加密,而7777每次发送的数据都是packet_len + bmpdata的结构
bmp头有十几个byte的数据是已知的,那么就可以破解出密钥!
key = 'J\x1fK\x1c\xb0\xd8%\xc7'
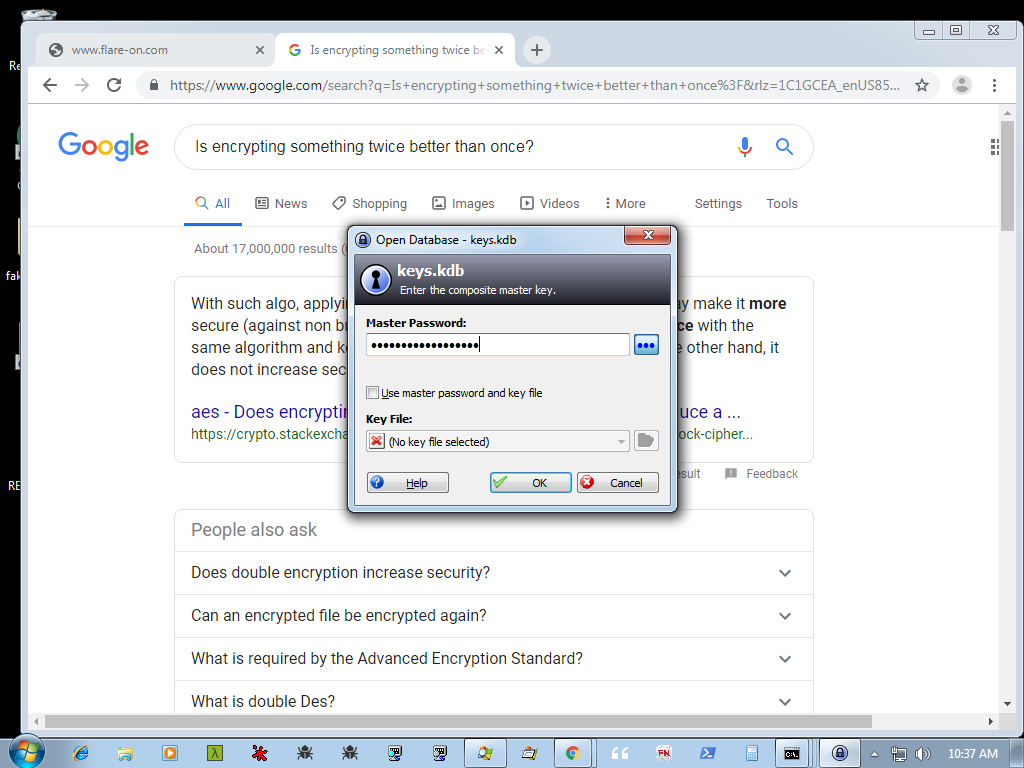
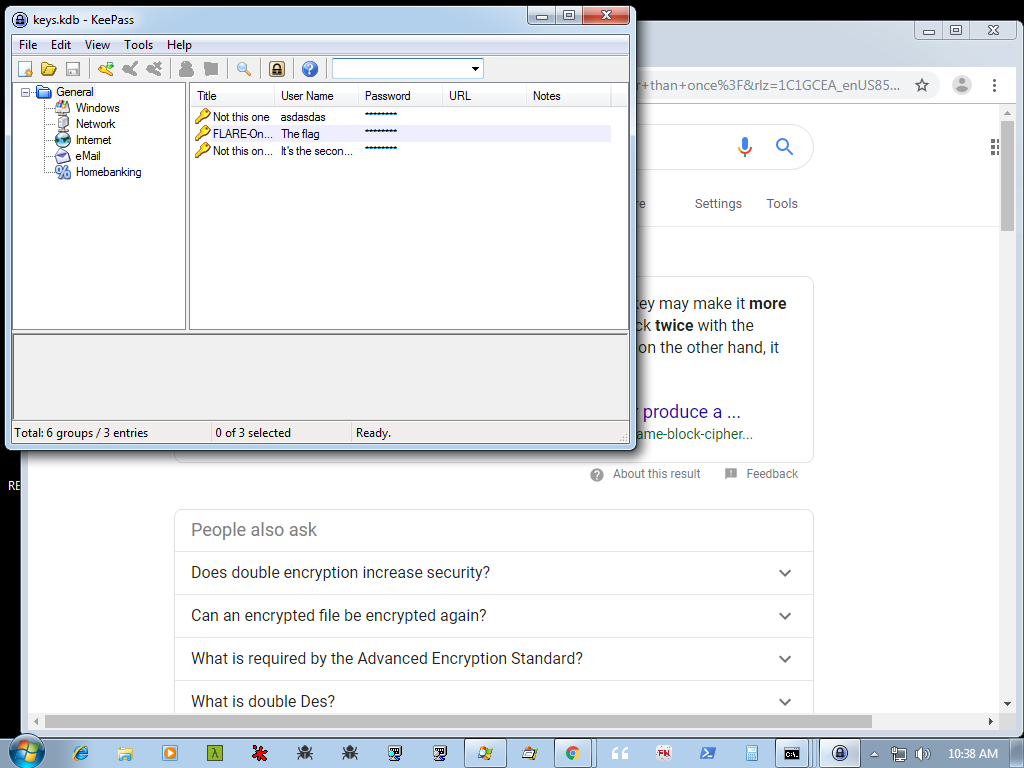
当我把屏幕截图解完,就发现了非常有意思的图片
结合图片可以知道flag就藏在keys.kdb里面!(不是看到这个我都差点忘了我是要找flag的了。。。)
打开keys.kdb的master key长度是18
接下来自然可以想到目标是解密出6666和8888端口的数据
拿到keys.kdb文件,并且从keylogger数据中读到密码
解密6666 8888的数据
7777的密钥是我们直接破解出来的,但是6666和8888的数据因为还再加了一层加密,就很难这么干了
因为加密顺序是LZNT1 compress -> RC4 with key ‘FLARE ON 2019\x00’ -> xor with xor key
可以先猜出前面的一点点数据,然后同理加密后破解
但尝试了一段时间没有成功,也不知道哪里出问题了,理论上是可以的
于是我又卡住了
之后我在dump数据包出来的时候,发现了一样东西
这里是同一个TCP数据包,怎么有两块长度一样的?
然后翻到下面的数据包,发现开头是\x10\x09\x00\x00,这不正是发出去的数据包的格式,前4个byte是包长度吗
但是正常情况应该是这4个字节也经过了xor加密
然后我就发现,这个包里面前半部分是经过xor加密的数据,后半部分是未经过xor加密的数据,两个数据是一样的。。。(或许是正如截图里的encrypt加密了两次?)
总的来说,这是stmedit没有逆清楚的锅,有可能是因为API用的Inject,原数据没有删掉(这里原因还不清楚
总之,接着这个思路6666和8888的数据都拿到了
keys.kdb拿到了
keylog也拿到了
从keylog拿到的密钥是th1sisth33nd111,这只有15位,还缺了3位
再细逆keylogger,发现这个keylogger问题很大
特殊字符不能记录到
大小写统一都转换成小写
从twitter上看到别人说从截图推断出来密码,嗯???
然后我就有点点被误导了
根据语义试了一堆
1
2
3
4
5
Th1s_Is_TH3_3nd111 Th1s_Is_Th3_3nd111 Th1s-is_th3-3nd111 Th1s-is-th3_3nd111 ...
卡了整整一天后,我就去问大佬了
超感谢@zvikam非常多的提示,指导我怎么去找到这个key
试着从dump文件中搜了一下3nd
居然找到了!
Th!s_iS_th3_3Nd!!!
终于拿到了flag
其中前面我刚开始爆破的时候思路有点错了,我着重爆破的是那3个不可见字符,大小写没有太多的考虑
并且!我没想到叹号会被转化成1,现在再细看,的确就是这样的,这个keylogger对于特殊字符没有检查shift,所以0-9键盘上的特殊字符都会被转化成数字
所以其实爆破也是一个正解,只不过我爆破的方向不对
这整一个病毒的思路非常明确
Man.sys是主病毒,通过4444端口接收控制数据
再发送捕获的数据到 6666 7777 8888 端口
PS: 官方题解是直接用的windbg做的,tql
这里说好一下一些我自己做的时候没注意到的关键点
crash dump的原因是因为man.sys下载了一段32位的驱动,但系统是64位的,当32位驱动试图运行在64位系统的时候,系统crash了
至于man.sys头部被抹掉,官方的一种做法是把另外的sys文件头复制过来,再手动修正,只要确保.text是对的就OK了,其他部分可以一律看作.data
我是手动恢复RC4混淆的字符串的。。的确是太蠢太麻烦了,可以通过ida的插件辅助完成
https://github.com/fireeye/flare-emu
emmmm关于我提取dll的方式,那的确是另一种方式
这些dll不是全都注入到svchost里的,因为有些dll的安装方式是通过ioctl,最终这些信息都储存在man.sys的那个链表中
关键点在这,因为这些都是直接从crash dump中获得的,那个链表我们其实可以直接通过windbg跟踪查看具体数据,通过这个信息,我们可以看到具体是注入到哪个进程,以及dll捆绑的端口是多少
引用一下官方wp的结构体
1
2
3
4
5
6
7
8
9
10
11
12
13
typedef struct _INJECTED_PAYLOADS { ULONG moduleId; LIST_ENTRY link; KMUTEX payloadMutex; ULONG_PTR baseAddress; ULONG_PTR runOffset; ULONG_PTR loadedDllSize; BOOLEAN isExfilDll; BOOLEAN isCryptoDll; ULONG exfilPort; PEPROCESS injectedProcess; } INJECTED_PAYLOADS, *PINJECTED_PAYLOADS;
像这些都是可以获得的
同理,stmedit在安装端口加密也是通过ioctl实现的,并且同样包含一个链表,dump出这个链表同样是可以找到加密的key,并不是一定要靠猜的
关于其他大佬的做法,也能学到很多
https://bruce30262.github.io/flare-on-challenge-2019-write-up/#level-12
中提到,在逆man.sys的时候,要恢复库函数,可以通过Volatility的帮助
Later did I know that you can just use Volatility’s impscan command to identify calls to APIs. The command even has an option to generate an IDA .idc file that help us mark the function name in IDA !
还有一个写得超详细的大佬在获取键盘记录上提供了一个非常刺激的思路
https://github.com/eleemosynator/writeups/tree/master/flare-on-6/12%20-%20help
大致意思就是根据windows键盘驱动云云~~可以直接从windows驱动拿到键盘Keystroke event信息
Keyboard issues a processor interrupt when a keystroke event (key-up or key-down) is ready to be processed.
The [Interrupt Service Routine] of the low-level keyboard driver i8042prt.sys handles the interrupt.
As the operating system may be busy with other things when the keyboard interrupt is received, i8042prt.sys stores the keystroke event in a ring buffer (which resides in Non-Paged memory) which the OS can then process at its leisure.
这个方法简直太炫酷了,这样就可以直接拿到键盘记录数据,而不是靠猜靠爆破了
高能预警!!!
然后还有大佬是………………纯粹靠数据分析????
https://sysenter-eip.github.io/FlareOn2019_NoReversing
screenshot数据是直接看出来8byte xor然后用GBS(一个工具)处理查看发现是图片,然后猜key解出来的
在看完截图知道需要获得kdb后,直接从crash dump中得到了keys.kdb文件
然后猜了一下可能存在keylogger数据,和8888端口发送的数据包用的是同一个密钥,对比不同的数据包,发现有相同的MSB存在,就用滑动窗口去破解了(Orz)并且猜出来许多windows的病毒都是使用LZNT1
剩下就跟我一样在crash dump中搜到了master key
还有一种情况,既然拿到keys.kdb了,那是不是可以直接破解这个文件?
答案是可以的,需要逆一下cng.sys
https://gist.github.com/Sin42/feb693a5b29679f8137b2d751aeb1e31
直接就把keys.kdb破解了 Orz
佩服得五体投地
总结 其实整篇文章都写得像流水账,主要记录的是我的解题过程,我当时是怎么想的
详细的writeup网上有很多,而且flareon官方的writeup也足够详细
这总是能让我学到许多
大佬们都tqltql Orz
希望明年能再接再厉
要说真的挑一道自己喜欢的题目,那可能就是12题吧,因为真的学到了许多许多,非常偏向于实际的病毒分析
但是也折磨得我够呛的Orz
感谢flareon的组织(我们明年再见(滑稽))
PPS:牌子什么时候才能寄到呢?